Push code to Devops Azure server
Devops tutorial: In earlier post I explained how to get started with DevOps Azure server with your free live or outlook email id, that tutorial will help you to understand what DevOps is and why you should start using DevOps Repository.
Here you learn how to push code to azure devops repository from local machine using visual studio 2019 SDK.
Before we start working with Azure DevOps, we must get familiar with GitHub utility, there are two ways we can start using git command, one from developer command prompt and secondly from Visual Studio Git tolls.
to work with git command prompt, you need to install git on your machien from following url
https://git-scm.com/download/win
Here in this example we use Git tools in Visual Studio for connecting devops server. make sure you have login to dev.azure.com server.
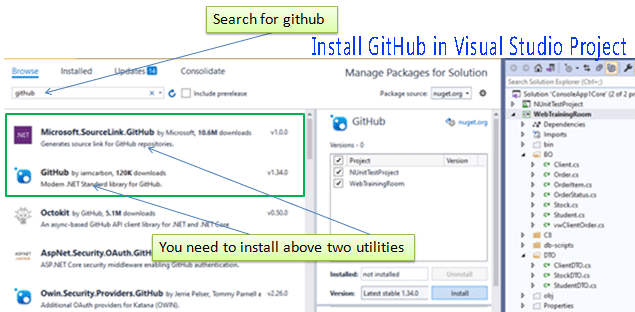
To push and pull from devops server we need to have GitHub installed in our machine, open your visual studio project and then nuget package manager, because we have to install GitHub utilities in our current project (unless we already have it).
Two utilities to be installed, Microsoft SourceLink Github and GitHub.
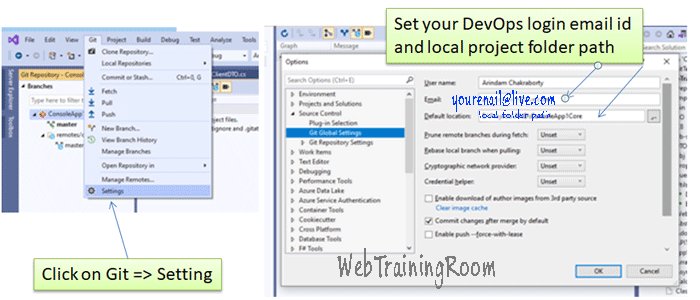
Now if you notice on top menu bar, there is a new menu "Git" has been added.
Now go to Git => Settings, and set your local folder, your name and DevOps login email.
once you click ok, it will ask you to login to devops using your live or outlook or microsoft email id authentication.
In Git settings, you need to set the source (local source code path) and destination (devOps server project folder path)
After your successful login the code base will be pushed to devops server automatically (for the first time, otherwise you need to click on push menu under Git).
Once the pushing process is complete, you will see all the files in your visual studio solution has a lock icon next to it.
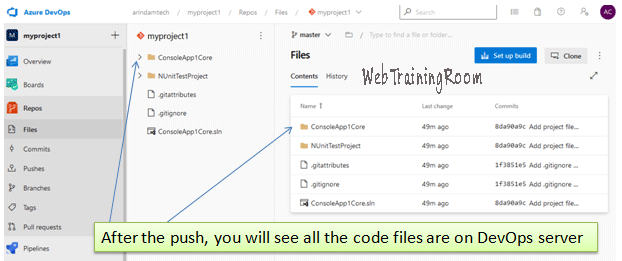
And after the push, you will see all the code files in Devops server under your specified project folder.
Now so far we have seen how to push code base from visual studio local machine to DevOps project folder, I hope you enjoyed.
Now when you make further changes in our code base, you need to keep pushing all changes to devops repository, so when other developer pull from that base they will be able to get the updated code.
Now let’s understand how to make changes in your local files, folder or in solution, and push those changes to devops repository.
- Making changes in existing file, Add a new property to existing class Student
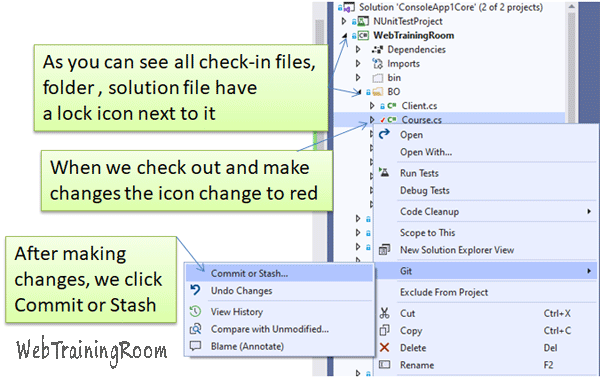 After making changes in any file, just make sure compilation is happening properly, then right click on that file in solution explorer, then go to Git, click on comment or stash.Make sure you check the “Amend” check box when writing comment and then click commit.Finally click push button from top menu.
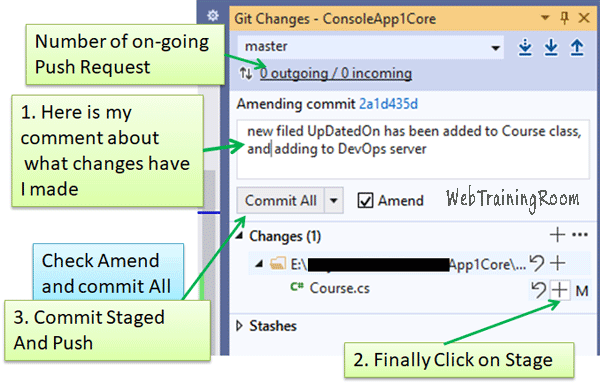
- We can create any new class (like Course class in this example), and add the new file to solution. The git push process remain same, only difference instead of pushing one single file, you need to push the entire solution to azure devops server.When you add any new file to solution, you need to push the solution, which will push all the new files added to solution including existing files, so you can consider this as complete project push, make sure you write all necessary comments, so other developers can understand why or what changes you have made without any extra effort.


